Today, I’m excited to share my Cake Pop Recipe Without Frosting. As a devoted baker, I’ve often found myself craving the delightful combination of moist cake and a sweet, chocolatey shell without the overwhelming sweetness of frosting.
So, I set out to perfect a cake pop recipe that delivers all the flavor and charm you’d expect, minus the sugary frosting.
In this step-by-step guide, I’ll walk you through the simple yet scrumptious process of crafting these delectable treats.
Get ready to indulge in cake pops that are perfect for any occasion, from birthdays to afternoon tea or simply satisfying your sweet tooth. Let’s dive in!
What Is Cake pop recipe without frosting?
A Cake Pop Recipe Without Frosting is a delightful dessert that combines moist cake and a chocolatey shell, minus the sweet frosting.
It’s a perfect treat for those who prefer a less sugary option. To make it, crumble baked cake, mix it with a binding agent like cream cheese or frosting alternative, shape it into balls, and dip them in melted chocolate.
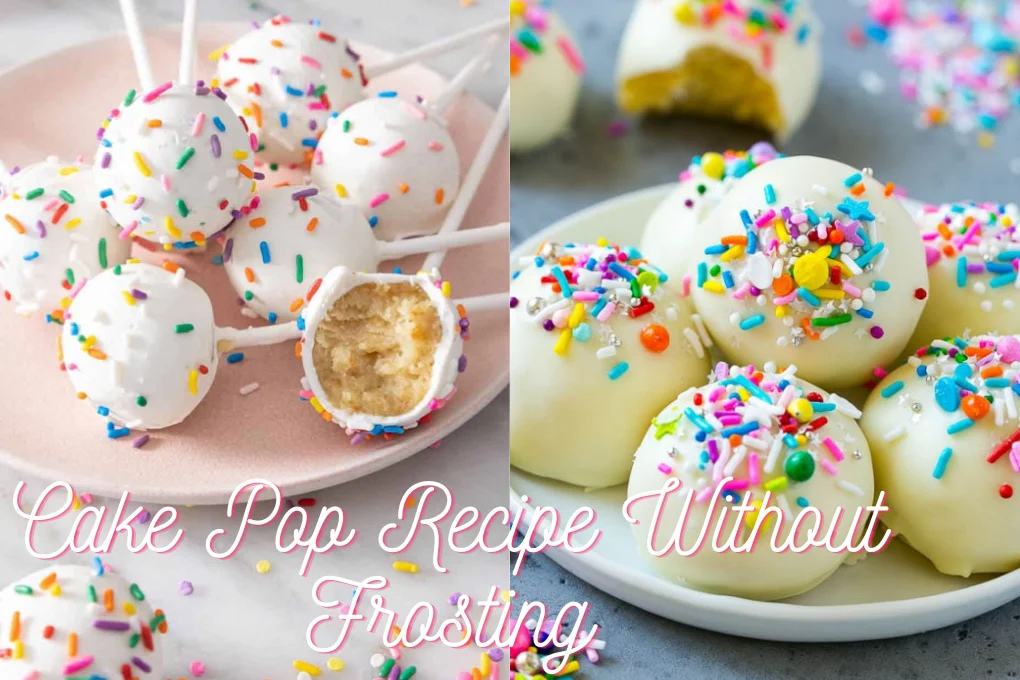
Customize with toppings, and voila! You have a cake pop with a rich, cakey center and a chocolate coating.
Enjoy these bite-sized delights for birthdays, tea time, or whenever you crave a sweet treat without excessive frosting. It’s a simple yet scrumptious recipe worth trying!
How to make Cake Pop Recipe Without Frosting
Recipe Time: Preparation: 20 minutes
Chilling: 1 hour
Total Time: 1 hour 20 minutes
Yield: Approximately 24 cake pops
Equipment Needed
- Baked cake (any flavor)
- 8 oz cream cheese, softened
- 12 oz semisweet chocolate, melted
- Lollipop sticks
- Sprinkles or toppings of your choice
- Styrofoam block for drying
Ingredients
- 1 baked cake (9×13 inches) – cooled (flavor of your choice)
- 8 oz cream cheese, softened
- 12 oz semisweet chocolate, melted
- Lollipop sticks
- Sprinkles or toppings of your choice
Step-by-Step Instructions
1. Crumble the Cake:
- Begin by crumbling the baked cake into fine crumbs using your hands or a fork.
2. Mix with Cream Cheese:
- In a mixing bowl, combine the cake crumbs and softened cream cheese.
- Mix until well combined, forming a dough-like consistency.
3. Shape the Cake Balls:
- Roll the mixture into bite-sized balls and place them on a lined baking sheet.
- Insert a lollipop stick into each cake ball.
4. Dip in Chocolate:
- Melt the semisweet chocolate using a microwave or a double boiler.
- Dip each cake pop into the melted chocolate, ensuring it’s fully coated.
5. Decorate:
- While the chocolate is still wet, add your favorite sprinkles or toppings to each cake pop.
6. Let Them Dry:
- Stick the cake pops into a Styrofoam block to dry and harden.
Nutrition Facts (Per Serving)
- Calories: 120
- Fat: 7g
- Carbohydrates: 14g
- Protein: 2g
Serving Suggestions
- Serve as a sweet treat for parties or gatherings.
- Gift them in decorative bags or boxes for a thoughtful present.
- Pair with a cup of coffee or hot chocolate for a cozy dessert.
Tips and Variations
1. Experiment with different cake flavors like chocolate, vanilla, or red velvet.
2. Try white chocolate or dark chocolate coatings for a unique twist.
3. Add crushed nuts, coconut flakes, or colored sugar for extra texture and flavor.
Health Benefits
While these cake pops are undoubtedly a sweet indulgence, there’s some good news:
1. Portion control: Their small size helps with portion control.
2. Mood booster: Satisfying your sweet tooth can improve your mood and provide a quick energy boost.
How to Store Leftover Cake pop recipe without frosting?
Storing Cake Pop Recipe Without Frosting is simple:
1. Cool Them: Let them cool at room temperature for about 30 minutes.
2. Cover: Place them in an airtight container, separating layers with parchment paper.
3. Refrigerate: Store in the fridge for up to 5 days.
4. Freeze: For longer storage, freeze in an airtight container for up to 3 months.
5. Thaw: When ready to enjoy, let them thaw in the fridge or at room temperature.
Follow these steps to keep your cake pops fresh and delicious!
What can I use as a binder for cake pops?
As a baker, I recommend using cream cheese as a binder for your cake pops. It provides a creamy texture and enhances the flavor without being too sweet.
Simply mix crumbled cake with softened cream cheese until you achieve a dough-like consistency.
This binder holds the cake pops together beautifully, making them easy to shape and dip in chocolate.
Why are cake pops so soft?
The softness of cake pops comes from the cake and binder combination. When you crumble and mix the cake with cream cheese or another binding agent, it creates a moist and tender texture.
This mixture makes it easy to shape the cake into pops while retaining their softness.
Additionally, the chocolate coating on the outside adds a layer of firmness, giving you that perfect contrast between the soft cake center and the crunchy outer shell.
So, that’s why cake pops are so wonderfully soft and delightful to bite into!
FAQs
Can I use a store-bought cake for this recipe?
Yes, absolutely! Store-bought cakes work perfectly fine for making cake pops without frosting.
How long in advance can I make these cake pops?
You can prepare these cake pops a day in advance and store them in the refrigerator until serving.
Are there any vegan alternatives for the cream cheese or frosting?
Yes, you can use dairy-free cream cheese or frosting alternatives for a vegan-friendly version.
Can I freeze these cake pops?
Yes, you can freeze them for longer storage. Just make sure to thaw them in the refrigerator before serving.
Conclusion
My Cake Pop Recipe Without Frosting is a delightful way to enjoy the flavors of cake without the overwhelming sweetness of frosting.
Whether you’re hosting a party, giving a heartfelt gift, or simply treating yourself, these cake pops are sure to please.
Plus, with a variety of flavors and toppings, you can get creative and make them your own. Give it a try, and let me know how your cake pops turn out in the comments below!

Hi, I’m Mary, and I’m a cake maker here at Cakerecipenow.com blog. With a passion for all things sweet and a flair for creativity in the kitchen, I spent 5 years perfecting the art of cake making and decorating. Over the years, I’ve honed my skills through countless baking experiments, and I’m excited to share my knowledge and experience with you.
I love trying new recipes, especially when they’re delicious, I love them so much… hope you like them! Thanks for the time!